Tidbits

Intranet NuGet source sharing

Problem:
You have a private NuGet repository to share code between projects, including their .pdb.
You use source control in a private repository to maintain the code those NuGets are build from.
But when you load the NuGet in your project, you sometimes can’t step into its code.
Very annoying, especially when debugging.

What happened?
Someone else built the NuGet, on their machine, which means they used the sourcefiles on their machine.
You might have the same files on yours, but in a different path, so the debugger can’t find them.


To solve that issue you could just all agree on a neutral, standardized path for your code. That way the stored path will always match the source files on your machine, regardless of who built the NuGet. But this also requires you to keep your local source on the same version as the NuGets you’re using.

Then there is Source Link, which is exactly what we want, but might not work with your infrastructure.
At least to my knowledge it can’t deal with a NuGet and a git repository both entirely run in network folders. Yet.

Something you can absolutely do in that scenario however, is this somewhat convoluted build setup:

  1. Create custom network folder based on project and source control version
  2. Copy source files to custom network folder
  3. Configure PathMap to point to network folder
  4. Profit?
<Project>
  <Target Name="SourceLinker" BeforeTargets="BeforeBuild" Condition="$(Configuration)=='Release'">
    <!-- Define base path -->
    <PropertyGroup>
      <BasePath>\\someNetworkFolder\MaybeAddSolutionName</BasePath>
    </PropertyGroup>
 
    <!-- Get hash of current git commit -->
    <Exec Command="git rev-parse HEAD" IgnoreExitCode="true" ConsoleToMSBuild="true">
      <Output TaskParameter="ConsoleOutput" PropertyName="GitHash"/>
    </Exec>
 
    <!-- Set target path -->
    <PropertyGroup>
      <TargetPath>$(BasePath)\$(AssemblyName)\$(GitHash)</TargetPath>
    </PropertyGroup>
 
    <!-- Create directory -->
    <MakeDir Directories="$(TargetPath)"/>
 
    <!-- Determine files to copy -->
    <ItemGroup>
      <SourceFiles Include="@(Compile)" Exclude="obj\**"/>
      <TargetFiles Include="@(SourceFiles->'$(TargetPath)\%(Identity)')"/>
    </ItemGroup>
 
    <!-- Copy source files -->
    <Copy SourceFiles="@(SourceFiles)" DestinationFiles="@(TargetFiles)"/>
 
    <!-- Remap source path -->
    <PropertyGroup>
      <PathMap>$(MSBuildProjectDirectory)=$(TargetPath)</PathMap>
    </PropertyGroup>
  </Target>
</Project>

All you need to do to use this, is to adjust BasePath and import the target in your NuGet projects.
The easiest way being of course placing it in a file called Directory.Build.targets in your solutions root folder.
Also pay attention to the condition. Right now this target copies the source files for every Release build. You might want to change that to fit your needs.

Now when someone tries to step into the code your NuGet provides, the pdb will direct them to a shared network folder containing the source files for exactly the right version of the right assembly. Yay!

There is a catch to this:
Not every IDE will allow you look up source code based on the path in a pdb. I know it works well in Rider and Visual Studio + ReSharper. Pure Visual Studio let’s you jump into the code while debugging, but not from the code directly. Also, check your IDEs settings. Both Rider and VS block external source files by default.

Explained

MSBuild

This is gonna be short…considering the scope of what I’ll attempt to write about.
Better read this in short bursts, with plenty of experimentation on your own.
Also: Brush up on XML. Nodes, attributes and how to escape characters. MSBuild is more or less a language written in XML – so you better know your way around it!


The big categories:

  1. Setup
  2. Targets
  3. Multiple Targets
  4. Properties
  5. Items
  6. Branching
  7. Tasks
  8. Custom Tasks

Avoid the topic

Let’s first introduce some metaphors to ease you into things (these are what i think of when working on build scripts):

Property
A string. A simple, singular text value.

Item
These are like arrays containing objects. Each object can have a set of properties different from the others.

Target
A (static) method. Each one can be called from other targets, chaining them.

Project
Class. Static though, just like targets. Contains targets and provides globally shared values.

Task
These are the commands that make up your “code”. There are a bunch of these predefined in MSBuild, but you can also create your own if needed.


Set the stage

You’ll want to play. A lot.
And for that you need a sandbox.

There are advantages to starting from an existing project in Visual Studio.
Not only does the IDE provide syntax highlighting and IntelliSense, the project comes bundled with a lot of existing “code” you can play with or learn from.
On the other hand, learning the basics might be easier with a clean plate.

So here’s my recommendation for you while getting used to MSBuild:

First, create a new (empty) file. The name doesn’t really matter, but it helps if the extension is .proj. I’ll call mine Dummy.proj.
Now open the file in Visual Studio (no Solution needed) and open a Terminal (View>Terminal), if you have none open.
In the terminal, use the cd command to move to the folder in which you’ve created the file before.
All we will be working with for a while are these two views: The open file and the terminal.

Try running the command msbuild.
If there are other project files in the folder you need to specify which one to build, e.g. msbuild Dummy.proj.

At this point you should get an error, telling you the root element is missing.
That means you did everything right and we can get to work!


Hello World

Let’s start with a classic.
If this was C# we’d output the message with a simple command to the console.
That command needs a method to contain it.
Which itself has to be part of a class (ignore the namespace).
Before you comment on that, i am aware that in newer C# versions we can skip right to the command.

The same applies to our MSBuild version as well.
The root element of our XML is a Project, the counterpart of a static class:

<Project>
</Project>

Now we need a “method”, which we just add as a Target node to our project:

<Project>
  <Target>
  </Target>
</Project>

All nodes in MSBuild have attributes to further specify how the program behaves, some optional, some mandatory.
Target has one mandatory attribute: Its name. For now the name doesn’t matter, but once you start working on actual build processes you need to be careful (i’ll get into why later). To keep it in the spirit of our C# analogy let’s call it Main:

<Project>
  <Target Name="Main">
  </Target>
</Project>

And that’s already a valid MSBuild “program”. Just try the msbuild command in the terminal. The result should be a successful build.

To make anything happen during the build, we need to add “code” to our target in the form of at least one Task.
In this case that’s a task that outputs a message to the console: Message

<Project>
  <Target Name="Main">
    <Message Text="Hello, World!"/>
  </Target>
</Project>

I think the task is easy enough to understand. Just call msbuild and let the magic happen!

Depending on where and how MSBuild is called you might not see the message. The default build output in Visual Studio for example will exclude messages of lesser importance.
Better get used to including Importance="high" in your Message calls!


Multiple Targets

What happens when we add a second target?

<Project>
  <Target Name="Main">
    <Message Text="Hello, World!"/>
  </Target>
 
  <Target Name="Other">
    <Message Text="Bye!"/>
  </Target>
</Project>

Running this has the same result as before. But why?
Just like in most languages, we need a specific entry point.
If we don’t tell it which target fulfills that role, MSBuild will just take the very first one it finds.
Give it a try, switch the order of those two nodes and run it.

So how can we specify a target?

The first option is to specify a target with the attribute DefaultTargets in your project node:

<Project DefaultTargets="Other">
  <Target Name="Main">
    <Message Text="Hello, World!"/>
  </Target>
 
  <Target Name="Other">
    <Message Text="Bye!"/>
  </Target>
</Project>

As the name implies, you can actually give it more than one target, e.g. Other;Main . In that case they’re just run in that order. Give it try!

The more common way would be to specify the target in the msbuild call, using the argument -t, e.g. msbuild -t:Other.
Just like before you can give it several targets to run in order, though this time separated by , e.g. msbuild -t:Other,Main.

For the rest of this article my examples are run by calling Main using msbuild directly.


Assuming we only start with Main, how would we go about running Other as well?

The most direct approach would be to use the task CallTarget to call it.

<Project>
  <Target Name="Main">
    <Message Text="Hello, World!"/>
    <CallTarget Targets="Other"/>
  </Target>
 
  <Target Name="Other">
    <Message Text="Bye!"/>
  </Target>
</Project>

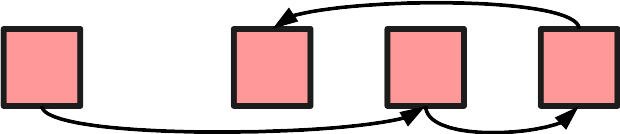
But the more interesting method is to add hooks to your targets.
For that purpose they have two attributes, BeforeTarget and AfterTarget. MSBuild will ensure that your targets are run according to your specification. For example:

<Project>
  <Target Name="Main">
    <Message Text="Hello, World!"/>
  </Target>
 
  <Target Name="Other" BeforeTargets="Main">
    <Message Text="Bye!"/>
  </Target>
</Project>

Will result in Other being run first, then Main.

Alternatively you can use the attribute DependsOnTargets to force another target to be run beforehand. Similar concept, but opposite control flow.


Remember what I said earlier about being careful with target names?

<Project>
  <Target Name="Main">
    <Message Text="Hello, World!"/>
  </Target>
 
  <Target Name="Other" BeforeTargets="Main">
    <Message Text="Bye!"/>
  </Target>
 
  <Target Name="Other" BeforeTargets="Main">
    <Message Text="Goodbye!"/>
  </Target>
</Project>

Maybe to the surprise of some, this does indeed work without any issues.
What you will notice however, is that there is no “Bye!” written to the output.
That’s because MSBuild usually just overwrites elements of the same name.
You’ll see the same happening later with properties and items.

When the file is parsed, the first Other will get evaluated and stored, but is then completely overwritten by the second target of the same name.
Which is why you need to be careful with your names when working on larger build scripts with many already existing targets. Don’t shy away from large descriptive names!


One last tangent on targets before we get to the juicy bits.
What do you expect the output of this to look like:

<Project>
  <Target Name="Main">
    <Message Text="Hello, World!"/>
    <CallTarget Targets="Helper"/>
  </Target>
 
  <Target Name="Other" AfterTargets="Main">
    <Message Text="Bye!"/>
    <CallTarget Targets="Helper"/>
  </Target>
 
  <Target Name="Helper">
    <Message Text="Helper is helpful..."/>
  </Target>
</Project>

Did you try running it? Surprised?

Targets in MSBuild are consumables. Each can be run only once per build.
It does make sense, in that each target has a specific purpose at a specific time during the build. Recurring tasks should be delegated to a (custom) Task, that can be called as often as needed.


Properties

Variables in MSBuild come in two different flavors, two datatypes if you will.
In both cases creating or modifying them requires a special node, which you can think of as declaring which type you’re using.

The easier to understand type is Property, and the special node we need is called PropertyGroup:

<Project>
  <Target Name="Main">
 
    <PropertyGroup>
      <Foo>Some string</Foo>
      <Bar>42</Bar>
    </PropertyGroup>
 
  </Target>
</Project>

Here we created two “variables”.
One called Foo containing some text and one called Bar with text that happens to match a number.
Changing these values is done by overwriting them:

<Project>
  <Target Name="Main">
 
    <PropertyGroup>
      <Foo>Some string</Foo>
      <Bar>42</Bar>
      <Bar>21</Bar>
    </PropertyGroup>
 
    <PropertyGroup>
      <Foo>Some other string</Foo>
    </PropertyGroup>
 
  </Target>
</Project>

Which can be done in a different group or the same.

You probably want to see which values are stored inside those properties.
The syntax for that is $(<property>). Here are some examples of how you can use it:

<Project>
  <Target Name="Main">
 
    <Message Text="Foo=$(Foo); Bar=$(Bar)"/>
 
    <PropertyGroup>
      <Foo>Some string</Foo>
      <Bar>42</Bar>
    </PropertyGroup>
 
    <Message Text="Foo=$(Foo); Bar=$(Bar)"/>
 
    <PropertyGroup>
      <Foo>$(Foo) value</Foo>
      <Bar>%24(Bar)</Bar>
    </PropertyGroup>
 
    <Message Text="Foo=$(Foo); Bar=$(Bar); %2524(Bar)"/>
 
  </Target>
</Project>

Points of note:

  1. Properties that aren’t defined yet can be used, they just don’t contain anything
  2. You can use existing properties when (re-)defining new ones
  3. “Escaping” is easiest with %<ascii hex>

In the examples above we’ve just created properties inside a single target. You can however also define them outside of targets as part of the project:

<Project>
  <PropertyGroup>
    <Var>Some string</Var>
  </PropertyGroup>
 
  <Target Name="Main">
    <Message Text="Var=$(Var)"/>
  </Target>
</Project>

By the way, all definitions are evaluated before the first target is run, so it doesn’t matter where in the project you define them.
Meaning the above has the same result as this

<Project>
  <Target Name="Main">
    <Message Text="Var=$(Var)"/>
  </Target>
 
  <PropertyGroup>
    <Var>Some string</Var>
  </PropertyGroup>
</Project>

and this

<Project>
  <PropertyGroup>
    <Var>No string</Var>
  </PropertyGroup>
 
  <Target Name="Main">
    <Message Text="Var=$(Var)"/>
  </Target>
 
  <PropertyGroup>
    <Var>Some string</Var>
  </PropertyGroup>
</Project>

Let’s talk about scope.
If this were a C# program, we could expect the properties inside targets to be entirely local, and the ones defined outside to be shared between all targets.
MSBuild has different approach, which you probably best experience for yourself with plenty of experimentation.

For the less patient ones, here’s mental model:

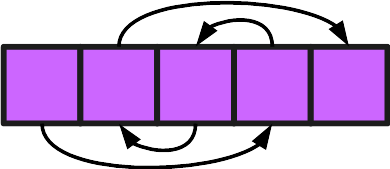
  • There is a global storage for all variables
  • Whenever a target is called, the then current global storage is cloned and used locally
  • When a target finishes, it’s local storage is copied into the global one
<Project>
  <PropertyGroup>
    <Var>Global</Var>
  </PropertyGroup>
 
  <Target Name="Main">
    <PropertyGroup>
      <Var>Main</Var>
    </PropertyGroup>
    <CallTarget Targets="Foo"/>
  </Target>
 
  <Target Name="Foo">
    <Message Text="This is the global value: $(Var)"/>
  </Target>
 
  <Target Name="Bar" AfterTargets="Main">
    <Message Text="This is from Main: $(Var)"/>
  </Target>
</Project>

Items

Just like properties, items need to be defined inside a special node, an ItemGroup. And the same rules for their scope apply.
Otherwise items are a unique beast.
Their most prominent application is as a list of files, but you can easily make use of their features for other things.

To start of easy, let’s turn the file you’re working on into an item.
To do so we use the attribute Include, which you can pass one or more file paths into.

<Project>
  <Target Name="Main">
    <ItemGroup>
      <OurFile Include="Dummy.proj"/>
    </ItemGroup>
  </Target>
</Project>

The paths you enter are always relative to the file you ran MSBuild with.
And in my case its name is Dummy.proj.

There is another way to get the project file, one that works the same for me as it does for you:
MSBuild defines a few global properties itself whenever you run it.
One of those is MSBuildProjectFile, which stores the initial project file.
So this:

<Project>
  <Target Name="Main">
    <ItemGroup>
      <OurFile Include="$(MSBuildProjectFile)"/>
    </ItemGroup>
  </Target>
</Project>

will put the file containing this very code into OurFile, no matter what name you chose.

Items in general are a list of different values, and each value is in of itself a set of key/value pairs. Which means we can’t just output the value in a message like we did with properties.
Well, technically we can, sort of.
The most basic approach would be almost identical to properties: @(<item>)

<Project>
  <Target Name="Main">
    <ItemGroup>
      <OurFile Include="$(MSBuildProjectFile)"/>
    </ItemGroup>
    <Message Text="@(OurFile)"/>
  </Target>
</Project>

Running this example doesn’t really show you the difference. And that’s alright for now, no need to rush.

Let’s focus on the key/value pairs i mentioned.
Each item has at least one of these. Some are predefined by MSBuild, others are custom additions you can make yourself.
To read those individually we include a format string in the item output:
@(<item>->'<format>') where format contains placeholders in the form of %(<key>).
The code above is basically the same as reading the Identity value:

<Project>
  <Target Name="Main">
    <ItemGroup>
      <OurFile Include="$(MSBuildProjectFile)"/>
    </ItemGroup>
    <Message Text="@(OurFile->'%(Identity))')"/>
  </Target>
</Project>

And of course the format string might contain other values as well:

<Project>
  <Target Name="Main">
    <ItemGroup>
      <OurFile Include="$(MSBuildProjectFile)"/>
    </ItemGroup>
    <Message Text="@(OurFile->'%(Identity): %(RootDir)%(Directory)%(Filename)%(Extension) (Last changed on %(ModifiedTime))')"/>
  </Target>
</Project>

These are some of the predefined values MSBuild provides.
To add our own, we need to modify the definition a little.
Imagine it as defining a property inside the item:

<Project>
  <Target Name="Main">
    <ItemGroup>
      <OurFile Include="$(MSBuildProjectFile)">
        <Foo>Bar</Foo>
      </OurFile>
    </ItemGroup>
    <Message Text="@(OurFile->'%(Foo)')"/>
  </Target>
</Project>

Just like with properties, you can use keys that aren’t defined for an item, they’ll just return an empty string.


For the next part I’m going to add a directory next the the project file, as well as two files in that directory:
Dummy.proj
Examples\A.txt
Examples\B.txt

When passing paths into the Include attribute, you can use wildcards to leave parts of the path unspecified. Effectively you get these options:
? for 1 character excluding the path separator
* for 0 or more characters excluding the path separator
** for 0 or more characters including the path separator

So this

<Project>
  <Target Name="Main">
    <ItemGroup>
      <TextFiles Include="Examples\*"/>
      <AllFiles Include="**"/>
    </ItemGroup>
  </Target>
</Project>

will create two items. One contains only the files in “Example”, the other will also include the project file.
Which means we now have items that contain more than one value.
How do we display those?

By default all values in an item are chained together, separated by an ;.

<Project>
  <Target Name="Main">
    <ItemGroup>
      <TextFiles Include="Examples\*"/>
      <AllFiles Include="**"/>
    </ItemGroup>
    <Message Text="@(TextFiles)"/>
    <Message Text="@(AllFiles,' | ')"/>
  </Target>
</Project>

Notice however what I did for AllFiles. Here i defined a custom separator for the output.

For some tasks, like in this case with Message, it’s fine to just list all values at once.
In many cases however, you want to perform actions for each value individually. For that we can make use of a similar syntax to what you saw earlier for formatting values:

<Project>
  <Target Name="Main">
    <ItemGroup>
      <TextFiles Include="Examples\*"/>
      <AllFiles Include="**"/>
    </ItemGroup>
    <Message Text="%(TextFiles.Identity)"/>
    <Message Text="%(AllFiles.Filename): %(CreatedTime)"/>
  </Target>
</Project>

This is called Batching, and it acts like a foreach loop that repeats a task for every value in an item.
You can generally use %(<key>), like in the format string, but somewhere you need to specify which item you’re referencing. Here that is done through %(<item>.<key>).
When you reference more than one item, the task is repeated once for all their values combined.


One of the interesting details about defining items is, that files you add to them with Include do not need to exist.
That means that this

<Project>
  <Target Name="Main">
    <ItemGroup>
      <Fictional Include="IdoNotExist"/>
    </ItemGroup>
    <Message Text="@(Fictional)"/>
  </Target>
</Project>

will output “IdoNotExist” as if it were a real file.
Which also means that for the next parts we don’t have to rely on some existing files to experiment.


Unlike properties, you don’t overwrite items by creating a new definition.
Instead this will add the newly defined values to the existing list.

<Project>
  <Target Name="Main">
    <ItemGroup>
      <ABC Include="A"/>
      <ABC Include="B"/>
      <ABC Include="C"/>
    </ItemGroup>
    <Message Text="@(ABC)"/>
  </Target>
</Project>

Alternatively we could specify the values all in one go (something you can do for regular files with wildcards as well):

<Project>
  <Target Name="Main">
    <ItemGroup>
      <ABC Include="A;B;C"/>
    </ItemGroup>
    <Message Text="@(ABC)"/>
  </Target>
</Project>

Since the files are separated by ;, and the default output separates values by ; as well, we can do this:

<Project>
  <Target Name="Main">
    <ItemGroup>
      <ABC Include="A;B;C"/>
      <Clone Include="@(ABC)"/>
    </ItemGroup>
    <Message Text="ABC: @(ABC)"/>
    <Message Text="Clone: @(Clone)"/>
  </Target>
</Project>

Now you might be wondering what this is used for.
If nothing else, it’s an excellent way of introducing the Exclude attribute.
Whatever you define in Exclude, is removed from whatever you define in Include.

<Project>
  <Target Name="Main">
    <ItemGroup>
      <ABC Include="A;B;C"/>
      <Clone Include="@(ABC)" Exclude="C;D"/>
    </ItemGroup>
    <Message Text="ABC: @(ABC)"/>
    <Message Text="Clone: @(Clone)"/>
  </Target>
</Project>

Of course if all you want is remove a value from your existing item you’re better of using the Remove attribute.

<Project>
  <Target Name="Main">
    <ItemGroup>
      <ABC Include="A;B;C"/>
      <Clone Include="@(ABC)" Exclude="C;D"/>
      <ABC Remove="C"/>
    </ItemGroup>
    <Message Text="ABC: @(ABC)"/>
    <Message Text="Clone: @(Clone)"/>
  </Target>
</Project>

To do or not to do

So far we’ve got the ability to store values, both singular and in bulk, as well as a method for output and in a way even input.
What’s missing now, is a way to branch depending on our values.
That, and a way to repeat code. But that comes later.

Almost every node in MSBuild has the optional attribute Condition.
In those you can create logical statements that are either true or false.
If their condition evaluates to false, the entire node is ignored.

<Project>
  <Target Name="Main">
    <PropertyGroup>
      <SomeValue>true</SomeValue>
    </PropertyGroup>
    <Message Condition="$(SomeValue)" Text="The value is true"/>
  </Target>
</Project>

To chain together several conditions we have the classic operations (and brackets):

  • AND
  • OR
  • !
<Project>
  <Target Name="Main">
    <PropertyGroup>
      <A>true</A>
      <B>false</B>
    </PropertyGroup>
    <Message Condition="($(A) and !$(B)) or ( ! $(A) AND $(B) )" Text="A xor B is true"/>
    <Message Condition="!(    ($(A) AND !$(B))    oR    (!$(A) aNd $(B))    )" Text="A xor B is false"/>
  </Target>
</Project>

As you can see they’re case insensitive and you may add additional whitespace to increase readability if you want.

Since Condition can be used almost everywhere, we can also combine statements to reduce redundancy:

<Project>
  <Target Name="Main">
    <PropertyGroup>
      <A>false</A>
      <B>false</B>
      
      <Xor>false</Xor>
      <Xor Condition="($(A) and !$(B)) or (!$(A) and $(B))">true</Xor>
      
      <Nand>false</Nand>
    </PropertyGroup>    
    <Message Text="A xor B = $(Xor)"/>
 
    <PropertyGroup Condition="!($(A) and $(B))">
      <Nand>true</Nand>
    </PropertyGroup>
    <Message Text="A nand B = $(Nand)"/>
  </Target>
</Project>

Besides simply chaining boolean values, we might want to compare values to create those booleans in the first place.
Again, the classics are all here:

  • ==
  • !=
  • >
  • >=
  • <
  • <=
<Project>
  <Target Name="Main">
    <PropertyGroup>
      <Int1>1</Int1>
      <Int2>2</Int2>
      <String1>ABC</String1>
    </PropertyGroup>
    
    <Message Condition="$(Int2)>=$(Int1)" Text="$(Int2)>=$(Int1)"/>
    <Message Condition="$(Int1)&lt;10" Text="$(Int1)&lt;10"/>
    <Message Condition="$(String1)!=$(String2)" Text="$(String1)!=$(String2)"/>
    <Message Condition="'$(String1)'!='$(String2)'" Text="'$(String1)'!='$(String2)'"/>
    <Message Condition="$(String1)=='ABC'" Text="$(String1)=='ABC'"/>
  </Target>
</Project>

Of course there are other sources for getting booleans, and we’ll get to those in a bit. For the moment i just want to mention a very important one:

<Project>
  <Target Name="Main">
    <Message Condition="Exists('$(MSBuildProjectFile)')" Text="This file exists?!"/>
  </Target>
</Project>

With Exists(<path>) you can check whether or not a file or directory actually exists. Very useful especially for working with items.

You probably picked up on it, but to clarify:
Values are interpreted based on context. Everything can be a text, but for boolean comparison that text needs to be true or false, and for value comparisons (except equality) the text needs to be a number.


Make it so

I tried avoiding it so far, but at this point it doesn’t make sense not to link the Microsoft Docs:
https://docs.microsoft.com/en-us/visualstudio/msbuild/msbuild-task-reference

Essentially, tasks are all very specific, and highlighting each one and explaining their quirks would extend this already extended wall of text (which already exist elsewhere) even more.
That’s why I’m only showing one example before moving on to more custom code, using actual code.

That example is exec. This task allows you to run command line commands. Very useful to extend your builds capabilities, or for integrating existing batch scripts. The only mandatory parameter we need to provide is a command or program to execute.

<Project>
  <Target Name="Main">
    <Exec Command="ROBOCOPY &quot;D:\From&quot; &quot;D:\To&quot; /e"/>
  </Target>
</Project>

The command I’m running here is ROBOCOPY, to copy the entire data contained in D:\From to D:\To.
Unfortunately this build will fail quite often, even though the command is executed without any issues.
That is because exec fails if the command we’re running returns anything other than a 0. And ROBOCOPY has a lot of different exit codes even for successful executions.
That’s why we need to turn off the exit code evaluation with an optional parameter:

<Exec Command="ROBOCOPY &quot;D:\From&quot; &quot;D:\To&quot; /e" IgnoreExitCode="true"/>

Of course now we won’t know whether or not our data was copied successfully, and the build might fail at some other point because of it. Or even worse, the build might succeed, but the result is malformed.
What we need to do is evaluate the exit code ourselves, tailored to the specifics of our command. And to get the exit code we need to provide an output parameter:

<Project>
  <Target Name="Main">
    <Exec Command="ROBOCOPY &quot;D:\From&quot; &quot;D:\To&quot; /e" IgnoreExitCode="true">
      <Output TaskParameter="ExitCode" PropertyName="OurExitCode"/>
    </Exec>
 
    <Error Condition="$(OurExitCode)&gt;8" Text="ROBOCOPY failed: $(OurExitCode)"/>
    <Message Text="ROBOCOPY succeeded"/>
  </Target>
</Project>

If a task provides output parameters, you can nest Output nodes in it, to map them to a property or item of your choice. Here I mapped the parameter ExitCode to a property OurExitCode. This property is now created as if we defined it as part of a PropertyGroup.
Afterwards we can use the error task to fail the build, if the exit code indicates a problem.


As mentioned above, tasks are very specific. Just have a stroll through the Microsoft Docs to get an overview what you can do and what you can’t.
For whatever you don’t find, there’s always the option of creating it yourself.

To start off we’ll have a look at property functions.
The simple version are methods intrinsic to strings (as in, the .NET class string), which you can just call when “reading” a property:

<Project>
  <Target Name="Main">
    <PropertyGroup>
      <SomeText>ABC</SomeText>
    </PropertyGroup>
    <Message Text="$(SomeText.Substring(1))"/>
    <Message Text="$(SomeText.Length)"/>
    <Message Text="$(SomeText.Replace('B','D'))"/>
  </Target>
</Project>

More complex is the second kind: Static method calls (and static properties).
The basic idea is to call a static method instead of reading a property, following the format $([Namespace.Class]::Method|Property).
So this outputs itself:

<Project>
  <Target Name="Main">
    <Message Text="$([System.IO.File]::ReadAllText('$(MSBuildProjectFile)'))"/>
  </Target>
</Project>

Unfortunately there is only a limited number of classes that are available for this feature.
So what do you do when you need a task that doesn’t exist and can’t be replicated by a static call? You write your own task.


I am the master of my own mistakes

Custom Tasks can be included in a project by using a UsingTask.
Those allow you to import code as a DLL (if you want to compile it beforehand) or as source code directly (.cs or .vb files). And if you don’t want do deal with additional files to maintain, you can even write the code directly in your MSBuild file (my personal favorite).

To start of, let’s create a new .NET Framework Library, which I’ll call DummyTask.
And the first thing you should do afterwards is to add two references (you’ll find both in Assemblies):
Microsoft.Build.Utilities.Core
Microsoft.Build.Framework

Technically you only need the first to get things running, but you want the other, too.

All we need to do now is create a new (public) class that inherits from Microsoft.Build.Utilities.Task
and override its Execute() method. For now you can just have it return true.

using Microsoft.Build.Utilities;
 
namespace DummyTask
{
    public class FooBar : Task
    {
        public override bool Execute()
        {
            return true;
        }
    }
}

And that’s it already on this end. A fully functional Task that doesn’t do anything.
In our MSBuild script we can import the Task with a single line:

<UsingTask TaskName="<Namespace>.<Class>" AssemblyFile="<PathToDLL>"/>

In my example that means something like this:

<Project>
  <UsingTask TaskName="DummyTask.FooBar" AssemblyFile=".\DummyTask\bin\Debug\DummyTask.dll"/>
 
  <Target Name="Main">
    <FooBar/>
  </Target>
</Project>

Running the target should simply succeed. No errors, warnings or output.
To change that, let’s add some output to see that everything worked. We can do so with a predefined method that mirrors the Message task:

using Microsoft.Build.Framework;
using Microsoft.Build.Utilities;
 
namespace DummyTask
{
    public class FooBar : Task
    {
        public override bool Execute()
        {
            Log.LogMessage(MessageImportance.High$"Message from {nameof(FooBar)}");
            return true;
        }
    }
}

Running FooBar is now equivalent to running

<Message Importance="high" Text="Message from FooBar"/>

This kind of task might have its uses, e.g. as a heartbeat to let you know the Buildserver hasn’t crashed, the build just takes longer. But for the most part you want the task to read from and/or write to Items and Properties.

The necessary code is is surprisingly simple. All we need to do is add a property to our class:

using Microsoft.Build.Framework;
using Microsoft.Build.Utilities;
 
namespace DummyTask
{
    public class FooBar : Task
    {
        public string SomeValue { getset; }
 
        public override bool Execute()
        {
            Log.LogMessage(MessageImportance.High$"The value is: {SomeValue ?? "NULL"}");
            return true;
        }
    }
}

With that we have a simple input for our task:

<Project>
  <UsingTask TaskName="DummyTask.FooBar" AssemblyFile=".\DummyTask\bin\Debug\DummyTask.dll"/>
 
  <Target Name="Main">
    <FooBar/>
    <FooBar SomeValue=""/>
    <FooBar SomeValue="abc"/>
  </Target>
</Project>

Note how our property receives a default value if not given a value, meaning we have to deal with null.
Unless of course we use a different data type. The property can be any IConvertible, which means this works as well:

public int SomeValue { getset; }
<FooBar/>
<FooBar SomeValue=""/>
<FooBar SomeValue="1"/>

If you don’t want to deal with default values, you can mark a property as mandatory with the Required attribute.

[Required]
public string SomeValue { getset; }

Now the build will fail if no value is provided.

That value was a simple property so far. What about items?
For those we need the data type ITaskItem, which essentially is collection of Key/Value pairs.

using Microsoft.Build.Framework;
using Microsoft.Build.Utilities;
 
namespace DummyTask
{
    public class FooBar : Task
    {
        public ITaskItem SomeValue { getset; }
 
        public override bool Execute()
        {
            Log.LogMessage(MessageImportance.High$"The item is: {SomeValue.ItemSpec}");
 
            foreach (string property in SomeValue.MetadataNames)
            {
                Log.LogMessage(MessageImportance.High$"{property}{SomeValue.GetMetadata(property)}");
            }
            return true;
        }
    }
}
<Project>
  <UsingTask TaskName="DummyTask.FooBar" AssemblyFile=".\DummyTask\bin\Debug\DummyTask.dll"/>
 
  <Target Name="Main">
    <ItemGroup>
      <Example Include="$(MSBuildProjectFile)">
        <CustomProperty>CP Value</CustomProperty>
      </Example>
    </ItemGroup>
    <FooBar SomeValue="@(Example)"/>
  </Target>
</Project>

Of course items usually come as part of a list, so our property should accept more than one:

public ITaskItem[] SomeValue { getset; }

What if your task should output values? You simply mark the property as Output.

[Output]
public string SomeValue { getset; }
 
public override bool Execute()
{
    SomeValue = $@"{Environment.UserDomainName}\{Environment.UserName}";
 
    return true;
}
<FooBar>
  <Output TaskParameter="SomeValue" PropertyName="CurrentUser"/>
</FooBar>
 
<Message Text="Current user: $(CurrentUser)"/>

And finally (if that wasn’t obvious by now): The return value of Execute is evaluated by MSBuild to decide if the build failed or may continue. You can always log error messages, but they don’t determine whether or not the build actually failed.

That’s it already. Pretty simple, right?
The most complicated part is setting up the project and adding the DLL to your build script.

I compiled the code as a .NET Framework library, but you can also use .NET Standard.
Both are accepted by UsingTask.


Going a step further, we can put the source code of our task inside the MSBuild script to have it be compiled and run automatically, without us doing anything.

Before, we used the TaskName and AssemblyFile attributes of the UsingTask to specifiy a specific class in our compiled DLL file.
Now we’re going to use TaskName to define the name, and AssemblyFile to reference a library that can compile our code. Luckily MSBuild already offers one such library, meaning we can do this (ignore that the build would fail):

<Project>
  <UsingTask TaskName="FooBar" AssemblyFile="$(MSBuildToolsPath)\Microsoft.Build.Tasks.Core.dll" TaskFactory="CodeTaskFactory"/>
 
  <Target Name="Main">
    <FooBar/>
  </Target>
</Project>

Providing a library isn’t enough though. We also need to specify which part of it to use, by providing a value for TaskFactory. Use CodeTaskFactory if you’re writing .NET Framework code and RoslynCodeTaskFactory for .NET Standard.

As you’ll quickly find out when running the above script, we’re missing some parts now.
First, we need to specify the “signature” of our task, meaning its attributes and what output it provides. Our first task will have neither, so we can skip this for now.
Next is the actual code, which can be the entire class we wrote before, only the Execute method or even just its body. So this will already work:

<Project>
  <UsingTask TaskName="FooBar" TaskFactory="CodeTaskFactory" AssemblyFile="$(MSBuildToolsPath)\Microsoft.Build.Tasks.Core.dll">
    <Task>
      <Code>
        Log.LogMessage("FooBar!");
      </Code>
    </Task>
  </UsingTask>
 
  <Target Name="Main">
    <FooBar/>
  </Target>
</Project>

The code factory will use that data and generate some code for it before compiling:

//------------------------------------------------------------------------------
// <auto-generated>
//     This code was generated by a tool.
//     Runtime Version:4.0.30319.42000
//
//     Changes to this file may cause incorrect behavior and will be lost if
//     the code is regenerated.
// </auto-generated>
//------------------------------------------------------------------------------
 
namespace InlineCode
{
    using System;
    using System.Collections;
    using System.Collections.Generic;
    using System.Text;
    using System.Linq;
    using System.IO;
    using Microsoft.Build.Framework;
    using Microsoft.Build.Utilities;
 
 
    public class FooBar : Microsoft.Build.Utilities.Task
    {
 
        private bool _Success = true;
 
        public virtual bool Success
        {
            get
            {
                return _Success;
            }
            set
            {
                _Success = value;
            }
        }
 
        public override bool Execute()
        {
 
            Log.LogMessage("FooBar!");
 
            return _Success;
        }
    }
}

And yes, that means you can use the Success property to signal a failure in your task as an alternative to the return statement.

Since we have no project, certain settings need to be provided by XML. Those being using statements you would make in your code files, and DLL references in the project file.

<Project>
  <UsingTask TaskName="FooBar" TaskFactory="CodeTaskFactory" AssemblyFile="$(MSBuildToolsPath)\Microsoft.Build.Tasks.Core.dll">
    <Task>
      <Reference Include="System.Windows.Forms"/>
      <Using Namespace="System.Windows.Forms"/>
      <Code>
        MessageBox.Show("FooBar!", "$(MSBuildProjectFile)");
      </Code>
    </Task>
  </UsingTask>
 
  <Target Name="Main">
    <FooBar/>
  </Target>
</Project>

To define our “signature”, we just add parameters as part of a ParameterGroup, where we can also specify additional attributes to determine how they are used.

<Project>
  <UsingTask TaskName="FooBar" TaskFactory="CodeTaskFactory" AssemblyFile="$(MSBuildToolsPath)\Microsoft.Build.Tasks.Core.dll">
    <ParameterGroup>
      <Desc/>
      <Values Required="true" ParameterType="System.Int32[]"/>
      <Sum Output="true"/>
    </ParameterGroup>
    <Task>
      <Code>
        Sum=Values.Sum().ToString();
        if(Desc!=null)
          Sum=string.Format(Desc,Sum);
      </Code>
    </Task>
  </UsingTask>
 
  <Target Name="Main">
    <FooBar Values="1;2;3;4;5;6" Desc="Sum of digits on a D6 is {0}">
      <Output TaskParameter="Sum" PropertyName="Sum"/>
    </FooBar>
 
    <Message Text="$(Sum)" Importance="high"/>
  </Target>
</Project>

If you need more control over the code, you can choose how much you provide and what is added by the CodeTaskFactory with the attrtibute Type in Code. Your options are:
Fragment – Method body of Execute
Method – The entire method Execute
Class – The entire code file

<Project>
  <UsingTask TaskName="FooBar" TaskFactory="CodeTaskFactory" AssemblyFile="$(MSBuildToolsPath)\Microsoft.Build.Tasks.Core.dll">
    <ParameterGroup>
      <Desc/>
      <Values Required="true" ParameterType="System.Int32[]"/>
      <Sum Output="true"/>
    </ParameterGroup>
    <Task>
      <Code Type="Class">
        using System.Linq;
        using Microsoft.Build.Framework;
        using Microsoft.Build.Utilities;
 
        namespace DummyTask
        {
          public class Summarizer
          {
            public int Sum { get; set; }
 
            public string Desc { get; set; }
 
            public override string ToString()
            {
              if (Desc == null)
                return Sum.ToString();
 
              return string.Format(Desc, Sum);
            }
          }
 
          public class FooBar : Task
          {
            public string Desc { get; set; }
 
            [Required]
            public int[] Values { get; set; }
 
            [Output]
            public string Sum { get; set; }
 
            public override bool Execute()
            {
              Summarizer summarizer = new Summarizer
              {
                Sum = Values.Sum(),
                Desc = Desc
              };
 
              Sum = summarizer.ToString();
 
              return true;
            }
          }
        }
      </Code>
    </Task>
  </UsingTask>
 
  <Target Name="Main">
    <FooBar Values="1;2;3;4;5;6" Desc="Sum of digits on a D6 is {0}">
      <Output TaskParameter="Sum" PropertyName="Sum"/>
    </FooBar>
 
    <Message Text="$(Sum)" Importance="high"/>
  </Target>
</Project>

If your code really requires this much control, you might be better off storing it separately in its own file. You then can reference it in Code using the Source attribute. Though of course at that point you might be better off switching to a DLL instead.
Also important to keep in mind: Your code is simply text data inside an XML node. You will have to escape some common characters like <, > and &.
Or you can escape the entire code in a CDATA block:

<Project>
  <UsingTask TaskName="Range" TaskFactory="CodeTaskFactory" AssemblyFile="$(MSBuildToolsPath)\Microsoft.Build.Tasks.Core.dll">
    <ParameterGroup>
      <Limit Required="true" ParameterType="System.Int32"/>
      <List Output="true" ParameterType="Microsoft.Build.Framework.ITaskItem[]"/>
    </ParameterGroup>
    <Task>
      <Code>
        <![CDATA[
if (Limit > 1000)
    Log.LogError("Limit must be 1000 or less");
else if (Limit < 1)
    Log.LogError("Limit must be 1 or greater");
 
Success = false;
if (Limit >= 0 && Limit <= 1000)
{
    Success = true;        
    List = new ITaskItem[Limit+1];
    for (int i = 0; i <= Limit; ++i)
        List[i] = new TaskItem(i.ToString());
}
        ]]>
      </Code>
    </Task>
  </UsingTask>
 
  <Target Name="Main">
    <Range Limit="10">
      <Output TaskParameter="List" ItemName="Range"/>
    </Range>
 
    <Message Text="@(Range)" Importance="high"/>
  </Target>
</Project>

Are we there yet?

Yes.

No? I feel like i have both written too much and too little at the same time.
Honestly, all i wanted to provide is a collection of all the things i had to teach myself in order to upgrade my build game. But….it’s not enough.
MSBuild is huge. There are so many details i never use and therefore didn’t cover, and many more i don’t even know about.

Your best bet is to play around and search the net.
A little warning: Visual Studio doesn’t always play nice with your edits to its projects. Instead, try to put your changes into separate files you can import.

Tidbits

Add a hammer to Build and Clean

Just show me the code.
Just quick snippets of two MSBuild targets I use variations of to make my life a little easier. They solve two problems:

  1. Output files of dependent projects aren’t copied into the current output.
    Project dependencies are handled really well in most cases, but I do occasionally run into this issue especially in scenarios like
    “A depends on B depends on C”,
    where A has only an indirect dependency on C.
  2. Clean doesn’t remove supplementary files.
    Basically clean only removes files that are generated by the project. Which is nice, don’t get me wrong. But I did spent many frustrating hours taking my code apart only to find out the issue was an outdated resource file in my bin folder.

Here’s a target for the first problem. I stretch the a part because you’ll likely want to adapt it based on your needs and preferences.

<Target Name="CopyDependentOutput" AfterTargets="AfterBuild" Condition="@(_ResolvedProjectReferencePaths)!=''">
  <Message Importance="high" Text="Copying output from: @(_ResolvedProjectReferencePaths->'%(Filename)')"/>
  <Exec Command="ROBOCOPY &quot;%(_ResolvedProjectReferencePaths.RelativeDir) &quot; &quot;$(MSBuildProjectDirectory)\$(OutputPath) &quot; /e > NUL" IgnoreExitCode="true"/>
</Target>

The big chunk of work is already done by one of the many tasks that come with MSBuild and are run as part of your standard build process.
The item _ResolvedProjectReferencePaths contains references to all the projects that needed to be resolved before the current one could be build. It’s all in the name really. The neat part is, it contains all projects, regardless of whether they are referenced directly or indirectly.

The easiest way to transfer all their data for me was to use a windows command, since it can copy files and folders recursively.
Should you also go for this solution, think about evaluating the exit code to abort an active build when the copy process didn’t work. In the above snippet we ignore any error.


And this is an example of how to tackle the second issue:

<Target Name="ClearOutput" AfterTargets="AfterClean">
  <ItemGroup>
    <FilesToDelete Include="$(OutputPath)*.*"/>
    <FoldersToDelete Include="$([System.IO.Directory]::GetDirectories('$(OutputPath)'))"/>
  </ItemGroup>
 
  <Message Importance="high" Text="Cleaning @(FilesToDelete->Count()) file(s) and @(FoldersToDelete->Count()) folder(s)"/>
  <Delete Files="@(FilesToDelete)" Condition="@(FilesToDelete)!=''"/>
  <RemoveDir Directories="@(FoldersToDelete)" Condition="@(FoldersToDelete)!=''"/>
</Target>

A bit more involved this one. The easiest solution would have been to just delete the entire output folder, of course. In my case however, I wanted to keep it intact and just remove its content.

The task is split into two parts: Clear all top level files and then recursively all folders.
The files are easy enough to do with a simple wildcard.
The folders are best listed with a static method call.
Actual removal is done with the predefined MSBuild tasks Delete and RemoveDir for files and directories respectively.


Both those targets are hooked to the end of the Build and Clean tasks through their AfterTargets attributes.
That means, as long as those targets are evaluated at all when our projects are processed, we’re done.
The most direct approach for that would be to add them “as is” in your project files.

The best solution for me though was to make use of Directory.Build.targets.
In case you’re not familiar with it:
Imagine a project in C:\Dev\Foo\Bar.csproj.
When you process that project, MSBuild will iterate upwards through your path (first C:\Dev\Foo\, then C:\Dev\ and finally C:\) until it finds two specific files or has nowhere left to go . Those two files are called Directory.Build.props and Directory.Build.targets.
Should they be found, their content is imported as if your project directly referenced them (which it kind of does if you follow the breadcrumbs through the forest of references and imports).

So what we can do now, is to put a file called Directory.Build.targets at the root of our solution, next to the .sln file, containing something similar to this:
<Project>
  <Target Name="CopyDependentOutput" AfterTargets="AfterBuild" Condition="@(_ResolvedProjectReferencePaths)!=''">
    <Message Importance="high" Text="Copying output from: @(_ResolvedProjectReferencePaths->'%(Filename)')"/>
    <Exec Command="ROBOCOPY &quot;%(_ResolvedProjectReferencePaths.RelativeDir) &quot; &quot;$(MSBuildProjectDirectory)\$(OutputPath) &quot; /e > NUL" IgnoreExitCode="true"/>
  </Target>
 
  <Target Name="ClearOutput" AfterTargets="AfterClean">
    <ItemGroup>
      <FilesToDelete Include="$(OutputPath)*.*"/>
      <FoldersToDelete Include="$([System.IO.Directory]::GetDirectories('$(OutputPath)'))"/>
    </ItemGroup>
 
    <Message Importance="high" Text="Cleaning @(FilesToDelete->Count()) file(s) and @(FoldersToDelete->Count()) folder(s)"/>
    <Delete Files="@(FilesToDelete)" Condition="@(FilesToDelete)!=''"/>
    <RemoveDir Directories="@(FoldersToDelete)" Condition="@(FoldersToDelete)!=''"/>
  </Target>
</Project>

Now all projects within the solution will automatically trigger one of our targets on every Build, Clean or Rebuild.


Some salt to add to this:
These targets add a lot of possibly unneeded overhead to your builds.
Make sure you actually need them and try different filters to limit what they work on.

Tidbits

Finally is no catch-all

This is just a short “nice to know” for C# exception handling, that i only learned about after half an hour of frustrated debugging.


Imagine some code which changes persistent data. Might be files, a database or some OS settings. Just something that stays even after your program closes.
Now imagine you have to change this data to make an important operation, but have to change it back after you’re done so you won’t mess up something else.

SetSystemValue();
DoWork();
ResetSystemValue();

What if something unexpected happens in DoWork?
The changes we made won’t be changed back. Can’t have that.
So, we do what we learned is the proper way of dealing with the unexpected:

try
{
    SetSystemValue();
    DoWork();
}
finally
{
    ResetSystemValue();
}

Now, no matter what happens in the try block, the changes we’ve made are going to be reversed.


Only, there is a condition to finally you usually don’t need to think about:
It isn’t executed until after catch.
And when there is no catch, the program just terminates.

See the problem?
Usually there will be a catch somewhere up the chain to handle the exception.
And if there isn’t and the program terminates, we don’t have to worry about some invalid data in our program anyway.

In this case however, the data exists outside the program, meaning any issues persist with it.


Solution:
Add a catch somewhere. Specifically a catch that doesn’t (re-)throw an exception. Having a try/catch at your programs root for logging might be useful anyway.
Of course, if you already have a try/finally, why not simply add a catch in there as well?
In my case I simply doubled down on the reset part (to avoid calling it twice), which now looks somewhat like this:

try
{
    SetSystemValue();
    DoWork();
}
catch
{
    ResetSystemValue();
    return;
}
 
ResetSystemValue();
Explained

Dictionary

The following references the implementation of System.Collections.Generic.Dictionary<TKey,TValue> in the .NET Framework 4.8, as it is shown here: https://referencesource.microsoft.com/#mscorlib/system/collections/generic/dictionary.cs
The code below is simplified to show the ideas. No verification, exception handling, optimizations, etc. In other words: unsafe.
Please do not use in your project as is.


A Dictionary is a structure that can map a specific value to another. It is like a List for which we can use anything as an index, not just a predefined integer value. And to improve performance it uses hashes of those custom indices internally. That’s why you might know it as HashMap from other languages.

There is not much I can tell you about Dictionary, that I haven’t said about HashSet already. That’s because they both work the same way.
And something in me shudders whenever i see redundancies.
Therefore I’ll just take the HashSet we made over there, and modify it to create a Dictionary from it.


Let’s start with the ability to store two values:
One will be the actual value to store (Value),
the other a custom identifier for accessing that value (Key).

private struct Item
{
    internal TK Key;
    internal TV Value;
    internal int HashCode;
    internal int Next;
}

As you can see, we can simply add another field in Item. Note that all of the previous code now has to reference Key for everything to still work.

How do we use Value then?
To start with, we add a second argument to Add, which allows us to specify the value for a key.
Furthermore, since we’re not dealing with a simple set anymore, adding a value using a key that already exists is considered an error.

public bool Add(TK keyTV value)
{
    if (Contains(key))
        throw new ArgumentException("Duplicate key");
 
    int added;
    if (_freeHead > 0)
    {
        added = _freeHead;
        _freeHead = _items[_freeHead - 1].Next;
    }
    else
    {
        if (_lowestUntouchedIndex >= _items.Length)
            Grow();
 
        added = ++_lowestUntouchedIndex;
    }
 
    (int index, int hashCode) = GetMappingIndex(key);
 
    _items[added - 1].Key = key;
    _items[added - 1].Value = value;
    _items[added - 1].HashCode = hashCode;
    _items[added - 1].Next = _mapping[index];
    _mapping[index] = added;
 
    ++_count;
    return true;
}

Sometimes we’re going to change values of already stored keys. To help with performance, this is going to be a special variation of Add.
Or rather, Add is going to be a variation of a general Insert method, just like a new method SetValue.

public bool Add(TK keyTV value)
    => Insert(keyvaluetrue);
 
public bool SetValue(TK keyTV value)
    => Insert(keyvaluefalse);
 
private bool Insert(TK keyTV valuebool addNew)
{
    (int index, int hashCode) = GetMappingIndex(key);
    for (int current = _mapping[index]; current > 0; current = _items[current - 1].Next)
        if (_items[current - 1].HashCode == hashCode && _items[current - 1].Key.Equals(key))
        {
            if (addNew)
                throw new ArgumentException("Duplicate key");
 
            _items[current - 1].Value = value;
            return false;
        }
 
 
    int added;
    if (_freeHead > 0)
    {
        added = _freeHead;
        _freeHead = _items[_freeHead - 1].Next;
    }
    else
    {
        if (_lowestUntouchedIndex >= _items.Length)
            Grow();
 
        added = ++_lowestUntouchedIndex;
    }
 
    _items[added - 1].Key = key;
    _items[added - 1].Value = value;
    _items[added - 1].HashCode = hashCode;
    _items[added - 1].Next = _mapping[index];
    _mapping[index] = added;
 
    ++_count;
    return true;
}

Contains and Remove can stay as they are, since they only interact with the key.


Now that we can store a value, we also need to be able to read it.
For that we add a new method GetValue, which works almost identical to Contains, except it returns the value it finds.

public TV GetValue(TK key)
{
    (int index, int hashCode) = GetMappingIndex(key);
    for (int current = _mapping[index]; current > 0; current = _items[current - 1].Next)
        if (_items[current - 1].HashCode == hashCode && _items[current - 1].Key.Equals(key))
            return _items[current - 1].Value;
 
    throw new KeyNotFoundException();
}

This method is assumes that the key exists.
Therefore, should we reach the end without returning a value, an Exception is thrown.
As an alternative access to values, for when the existence of the key isn’t known, we add TryGetValue.

public bool TryGetValue(TK keyout TV value)
{
    (int index, int hashCode) = GetMappingIndex(key);
    for (int current = _mapping[index]; current > 0; current = _items[current - 1].Next)
        if (_items[current - 1].HashCode == hashCode && _items[current - 1].Key.Equals(key))
        {
            value = _items[current - 1].Value;
            return true;
        }
 
    value = default;
    return false;
}

And finally, to provide a little more comfort, let’s add an indexer.

public TV this[TK key]
{
    get => GetValue(key);
    set => SetValue(keyvalue);
}

If your code looks like mine, this will cause the compiler to complain, since we already have an Item in this class.
There are two ways to solve this:
Either change the name of the Indexer (“Item” by default) using the IndexerName attribute, or change the name of our struct.


Apart from directly accessing a specific value, we might want to iterate all the values we’ve stored.
Conveniently we have an array filled with all our values, which we can just step through.
The only tricky part is to distinguish between actual values, and indices that either got deleted or never filled.
For the later we already know up to which index items got inserted.
For the former however, we need to make a small addition to Remove

_items[current - 1].HashCode = -1;

Since the hash codes we store are always positive, this is an easy marker for deleted values.

public IEnumerable<TVGetValues()
{
    for (int i = 0; i < _lowestUntouchedIndex; ++i)
        if (_items[i].HashCode >= 0)
            yield return _items[i].Value;
}

And with that we have a fully functional Dictionary!

public class Dictionary<TKTV>
{
    private struct KeyValueItem
    {
        internal TK Key;
        internal TV Value;
        internal int HashCode;
        internal int Next;
    }
 
    private KeyValueItem[] _items;
 
    private int[] _mapping;
 
    private int _freeHead;
    private int _lowestUntouchedIndex;
    private int _count;
 
    public int Count => _count;
 
    public TV this[TK key]
    {
        get => GetValue(key);
        set => SetValue(keyvalue);
    }
 
    public Dictionary()
    {
        _items = new KeyValueItem[3];
        _mapping = new int[_items.Length];
 
        _freeHead = 0;
        _lowestUntouchedIndex = 0;
        _count = 0;
    }
 
    public bool Add(TK keyTV value)
        => Insert(keyvaluetrue);
 
    public bool SetValue(TK keyTV value)
        => Insert(keyvaluefalse);
 
    private bool Insert(TK keyTV valuebool addNew)
    {
        (int index, int hashCode) = GetMappingIndex(key);
        for (int current = _mapping[index]; current > 0; current = _items[current - 1].Next)
            if (_items[current - 1].HashCode == hashCode && _items[current - 1].Key.Equals(key))
            {
                if (addNew)
                    throw new ArgumentException("Duplicate key");
 
                _items[current - 1].Value = value;
                return false;
            }
 
 
        int added;
        if (_freeHead > 0)
        {
            added = _freeHead;
            _freeHead = _items[_freeHead - 1].Next;
        }
        else
        {
            if (_lowestUntouchedIndex >= _items.Length)
                Grow();
 
            added = ++_lowestUntouchedIndex;
        }
 
        _items[added - 1].Key = key;
        _items[added - 1].Value = value;
        _items[added - 1].HashCode = hashCode;
        _items[added - 1].Next = _mapping[index];
        _mapping[index] = added;
 
        ++_count;
        return true;
    }
 
    public bool TryGetValue(TK keyout TV value)
    {
        (int index, int hashCode) = GetMappingIndex(key);
        for (int current = _mapping[index]; current > 0; current = _items[current - 1].Next)
            if (_items[current - 1].HashCode == hashCode && _items[current - 1].Key.Equals(key))
            {
                value = _items[current - 1].Value;
                return true;
            }
 
        value = default;
        return false;
    }
 
    public TV GetValue(TK key)
    {
        (int index, int hashCode) = GetMappingIndex(key);
        for (int current = _mapping[index]; current > 0; current = _items[current - 1].Next)
            if (_items[current - 1].HashCode == hashCode && _items[current - 1].Key.Equals(key))
                return _items[current - 1].Value;
 
        throw new KeyNotFoundException();
    }
 
    public bool Contains(TK key)
    {
        (int index, int hashCode) = GetMappingIndex(key);
        for (int current = _mapping[index]; current > 0; current = _items[current - 1].Next)
            if (_items[current - 1].HashCode == hashCode && _items[current - 1].Key.Equals(key))
                return true;
 
        return false;
    }
 
    public bool Remove(TK key)
    {
        (int index, int hashCode) = GetMappingIndex(key);
        int prev = 0;
        for (int current = _mapping[index]; current > 0; prev = currentcurrent = _items[current - 1].Next)
        {
            if (_items[current - 1].HashCode != hashCode || !_items[current - 1].Key.Equals(key))
                continue;
 
            if (prev < 1)
                _mapping[index] = _items[current - 1].Next;
            else
                _items[prev - 1].Next = _items[current - 1].Next;
 
            _items[current - 1].Next = _freeHead;
            _freeHead = current;
 
            _items[current - 1].HashCode = -1;
 
            --_count;
            return true;
        }
 
        return false;
    }
 
    public IEnumerable<TVGetValues()
    {
        for (int i = 0; i < _lowestUntouchedIndex; ++i)
            if (_items[i].HashCode >= 0)
                yield return _items[i].Value;
    }
 
    public IEnumerable<TKGetKeys()
    {
        for (int i = 0; i < _lowestUntouchedIndex; ++i)
            if (_items[i].HashCode >= 0)
                yield return _items[i].Key;
    }
 
    private (int Indexint HashCodeGetMappingIndex(TK key)
    {
        int hashCode = key?.GetHashCode() ?? 0;
        hashCode &= 0x7FFFFFFF;
        int index = hashCode % _mapping.Length;
 
        return (index, hashCode);
    }
 
    private void Grow()
    {
        KeyValueItem[] newArray = new KeyValueItem[GetNextLength()];
 
        Array.Copy(_items, newArray, _items.Length);
 
        _items = newArray;
 
 
        _mapping = new int[_items.Length];
 
        for (int i = 0; i < _lowestUntouchedIndex; ++i)
        {
            int mappedIndex = _items[i].Next % _mapping.Length;
            _items[i].Next = _mapping[mappedIndex];
            _mapping[mappedIndex] = i + 1;
        }
    }
 
    private int GetNextLength()
    {
        int c = _items.Length * 2 + 1;
        for (; Enumerable.Range(2, (int)Math.Sqrt(c)).Any(d => c % d == 0); ++c) { }
        return c;
    }
}

As always, my implementation of course differs from the official Dictionary.
The principals behind it however, are still the same.

Explained

HashSet

The following references the implementation of System.Collections.Generic.HashSet<T> in the .NET Framework 4.8, as it is shown here: https://referencesource.microsoft.com/#System.Core/System/Collections/Generic/HashSet.cs
The code below is simplified to show the ideas. No verification, exception handling, optimizations, etc. In other words: unsafe.
Please do not use in your project as is.


The best way to understand HashSet (in my opinion), is to ignore the hash part until the very end.
Leaving the question: What is a set?

Ignoring mathematical definitions, lets say a set is a way of grouping items without any specific order. The only property an item has in relation to a set is whether the set contains the item or not. Implicitly this prevents duplicates, since adding an item to a set that already contains it would not result in any new properties for either the set or the item.

For our code that means:
We need to be able to Add new items,
check if the set Contains a specific item,
and Remove an item from the set again.

All we need now to create our own set is a way to store those items.


Our first approach might be to repeat what we did for List. After all, List is designed to store data of (initially) unknown size. Same as our set, right?

Of course this would work, but where List leans more on the ‘add and keep data’ side, our set will have a lot of ‘add a bunch then remove some or all’.
And when removing a single item can result in tens of thousands of items needing to be moved in memory (true, i rarely have to work with that much data, but stay with me here), we might be better of finding a different storage structure.


Usually when needing memory we default to arrays (either directly or as the base for more complex types, like List), where items are simply placed in continuous blocks of memory. This makes it very easy to quickly access individual items, with the downside of requiring uninterrupted chunks of available free space.

undefined

Alternatively there are linked lists. Here we store items inside small containers, which also store pointers to other containers. Access to specific items is tricky, since we need to iterate through the list until we find it. We also need a little extra memory to store the pointers (well, references, but close enough).
In return, we can fit the items anywhere in memory, making much more efficient use of free space. Better yet, we can easily change an existing list by changing some pointers instead of moving actual data.

undefined

Ideal for our set. Well, almost, but we’ll come to that.
For now, lets implement a simple Set using a linked list.


public class Set<T>
{
    private class Item
    {
        internal readonly T Value;
        internal Item Next;
 
        internal Item(T value)
        {
            Value = value;
            Next = null;
        }
    }
 
    private Item _head;
 
    public Set()
    {
        _head = null;
    }
 
    public bool Add(T value)
    {
        Item prev = null;
        for (Item current = _head; !(current is null); prev = currentcurrent = current.Next)
            if (Equals(current.Valuevalue))
                return false;
 
        if (prev is null)
            _head = new Item(value);
        else
            prev.Next = new Item(value);
 
        return true;
    }
 
    public bool Contains(T value)
    {
        for (Item current = _head; !(current is null); current = current.Next)
            if (Equals(current.Valuevalue))
                return true;
 
        return false;
    }
 
    public bool Remove(T value)
    {
        Item prev = null;
        for (Item current = _head; !(current is null); prev = currentcurrent = current.Next)
        {
            if (!Equals(current.Valuevalue))
                continue;
 
            if (prev is null)
                _head = _head.Next;
            else
                prev.Next = current.Next;
 
            return true;
        }
 
        return false;
    }
}

And there it is.
A nested class Item to use as node in our linked list, and three methods to manipulate said list.
All of them return a boolean telling us whether or not the item was part of the set prior to executing the method.


Time to introduce a little twist: An array!
But why? After all, didn’t we use a linked list to avoid using arrays?

My best guess is performance.
I do not know the full reasoning behind this implementation in the official HashSet, but I can see the advantages it brings especially for memory (including the GC’s workload).
It is NOT needed for the hash part later. Not this array, at least.

But I digress.
Think back on the structure of a linked list. Now imagine that all those individual containers weren’t spread all over the memory, but arranged in a single line.

It is still a linked list. The order of items is determined by their references, not their position in memory.
Doesn’t this look just like an array?


Let’s start the implementation with an array to “reserve” a chunk of memory, in which we can place items for our linked list. This means that we can use indices inside that array instead of pointers. Which in turn makes it very easy to use a struct instead of a class for our nodes.

private struct Item
{
    internal T Value;
    internal int Next;
}
 
private Item[] _items;

You can imagine _items to be a pool of Items, some in use, others free to take.
The challenge this presents us with is to manage this pool:
How do we find free items?
We could add a flag in Item, or use a big bit mask in Set.
Aside from the memory overhead those would add, they only tell us whether a specific item is in use. We still need to search the array for one.
There is however an easy solution that uses almost no extra memory and gives us quick access to the next free item:
A second linked list in the same array!

The basic idea is, that we have one list of items for our set, and one list of free items. All items in the array are always part of one of those two.
Whenever we add a value to the set, we take an item from the start of the free list.
Whenever we remove a value, we move it’s item back to the free list.

private int _head;
private int _freeHead;
 
public Set()
{
    _items = new Item[10];
 
    _head = -1;
    _freeHead = _items.Length - 1;
 
    for (int i = _freeHeadi >= 0; --i)
        _items[i].Next = i - 1;
}
 
public bool Add(T value)
{
    int prev = -1;
    int current = _head;
    for (; current >= 0; prev = currentcurrent = _items[current].Next)
        if (_items[current].Value.Equals(value))
            return false;
 
    int added = _freeHead;
    _freeHead = _items[_freeHead].Next;
 
    if (prev < 0)
        _head = added;
    else
        _items[prev].Next = added;
 
    _items[added].Value = value;
    _items[added].Next = -1;
 
    return true;
}
 
public bool Contains(T value)
{
    for (int current = _headcurrent >= 0; current = _items[current].Next)
        if (_items[current].Value.Equals(value))
            return true;
 
    return false;
}
 
public bool Remove(T value)
{
    int prev = -1;
    for (int current = _headcurrent >= 0; prev = currentcurrent = _items[current].Next)
    {
        if (!_items[current].Value.Equals(value))
            continue;
 
        if (prev < 0)
            _head = _items[current].Next;
        else
            _items[prev].Next = _items[current].Next;
 
        _items[current].Next = _freeHead;
        _freeHead = current;
 
        return true;
    }
 
    return false;
}

This does work quite nicely.
Except for one crucial flaw: A constant size.
The Add method above assumes there will always be another free item.
But we initialize the array with a fixed length of 10…


What we need now is a similar function to what we have in List, to dynamically increase the size of our array when needed.

private void Grow()
{
    Item[] newArray = new Item[GetNextLength()];
 
    Array.Copy(_items, newArray, _items.Length);
 
    newArray[_items.Length].Next = _freeHead;
    _freeHead = newArray.Length - 1;
 
    for (int i = _freeHeadi > _items.Length; --i)
        newArray[i].Next = i - 1;
 
    _items = newArray;
}
 
public bool Add(T value)
{
    int prev = -1;
    int current = _head;
    for (; current >= 0; prev = currentcurrent = _items[current].Next)
        if (_items[current].Value.Equals(value))
            return false;
 
    if (_freeHead < 0)
        Grow();
 
    int added = _freeHead;
    _freeHead = _items[_freeHead].Next;
 
    if (prev < 0)
        _head = added;
    else
        _items[prev].Next = added;
 
    _items[added].Value = value;
    _items[added].Next = -1;
 
    return true;
}

How does it grow, though? Double the size like List?
Not quite, HashSet is a little peculiar about this.
The new size it chooses is a prime number greater than or equal to double the current size, with an initial size of at least 3.
But not always the first prime. Up to a value of 7199639 primes are read from a static int array, which skips a lot of them. Any primes greater than that are calculated.
(We’re going to change those rules a bit and stick to the basic prime number idea).


To finish up the Set, let’s add a few details. These will pretty much mirror what HashSet does.

First, a counter to tell us the total amount of items.
We can simply use an internal integer to in- or decrement with every successful Add or Remove.

Secondly, we make a slight change to our “references”, by which i mean the indices of specific items in the array.
Instead of storing the actual index, we’ll store the index+1. So a reference to the second item is stored as 2, a reference to the first as 1 and a lack of any reference (what we used -1 for up to now) is stored as 0.
This is done to make the default value of Item.Next reference nothing, foregoing the need to change that value after initializing a new array.

This ties into our third change, in which we add an index for the lowest, untouched item in our array “pool”.
Essentially this allows us skip preparing the free items list.
When we need a free item, but the free list is empty, we can refer to the lowest untouched index.
Whenever we remove an item it is added to the free items list, to be used by the next add.
Basically we try to take up all the space in the lower part off the array first, moving into higher indices only when we run out of space.

Our Set now looks like this:

public class Set<T>
{
    private struct Item
    {
        internal T Value;
        internal int Next;
    }
 
    private Item[] _items;
 
    private int _head;
    private int _freeHead;
    private int _lowestUntouchedIndex;
    private int _count;
 
    public int Count => _count;
 
    public Set()
    {
        _items = new Item[0];
 
        _head = 0;
        _freeHead = 0;
        _lowestUntouchedIndex = 0;
        _count = 0;
    }
 
    public bool Add(T value)
    {
        int prev = 0;
        for (int current = _headcurrent > 0; prev = currentcurrent = _items[current - 1].Next)
            if (_items[current - 1].Value.Equals(value))
                return false;
 
        int added;
        if (_freeHead > 0)
        {
            added = _freeHead;
            _freeHead = _items[_freeHead - 1].Next;
        }
        else
        {
            if (_lowestUntouchedIndex >= _items.Length)
                Grow();
 
            added = ++_lowestUntouchedIndex;
        }
 
        if (prev < 1)
            _head = added;
        else
            _items[prev - 1].Next = added;
 
        _items[added - 1].Value = value;
        _items[added - 1].Next = 0;
 
        ++_count;
        return true;
    }
 
    public bool Contains(T value)
    {
        for (int current = _headcurrent > 0; current = _items[current - 1].Next)
            if (_items[current - 1].Value.Equals(value))
                return true;
 
        return false;
    }
 
    public bool Remove(T value)
    {
        int prev = 0;
        for (int current = _headcurrent > 0; prev = currentcurrent = _items[current - 1].Next)
        {
            if (!_items[current - 1].Value.Equals(value))
                continue;
 
            if (prev < 1)
                _head = _items[current - 1].Next;
            else
                _items[prev - 1].Next = _items[current - 1].Next;
 
            _items[current - 1].Next = _freeHead;
            _freeHead = current;
 
            --_count;
            return true;
        }
 
        return false;
    }
 
    private void Grow()
    {
        Item[] newArray = new Item[GetNextLength()];
 
        Array.Copy(_items, newArray, _items.Length);
 
        _items = newArray;
    }
 
    private int GetNextLength()
    {
        int c = _items.Length * 2 + 1;
        for (; Enumerable.Range(2, (int)Math.Sqrt(c)).Any(d => c % d == 0); ++c) { }
        return c;
    }
}

A fully functional, fairly optimized Set.
The largest performance sink is the time it takes to iterate through items to find a specific value. If only there was a way to….


Right, the hash part.
Finally here.

Let’s use an example:
Imagine a set that contains all integers from 1 to 100.
If we want to look for a specific value in this set, we’ll have to iterate through the entire linked list until we either find a match, or reach the end.
Best case: 1 iteration
Worst case: 100 iterations

Now imagine our set being actually two sets (or more accurately, two linked lists in the same set):
One for values from 1 to 50, and one for 51 to 100.
Now whenever we want check for a value, we can simply choose which one to look in beforehand.
Best case: Still 1 iteration
Worst case: Now only 50 iterations

And why stop at two? Three sets? Ten? Why not one hundred?


The difficult part is the decision which set to use for a particular value.
An that is where we finally make use of a hash.

Every object in C# inherently allows us to use GetHashCode to generate an integer.
Objects with the same values always generate the same hash code, but different objects (ideally) generate different hash codes.

And how do we relate those to a specific linked list?
By using them as the index in an array of “pointers”.
Instead of a single field to store the head of a list, we now use an array to store several heads of as many lists as we like.

private int[] _mapping;

Using a simple modulo we can associate different hash codes with different positions in this array.

private int GetMappingIndex(T value)
{
    int hashCode = value.GetHashCode();
    if (hashCode < 0)
        hashCode = -hashCode;
 
    return hashCode % _mapping.Length;
}

Keep in mind that hash codes might be negative. Here we simply invert the value if it is negative. Below we’ll do it like HashSet and clear the sign bit.

As a consequence of having the length of our array influence the calculated index, we have to redo the entire mapping every time our HashSet grows.

private void Grow()
{
    Item[] newArray = new Item[GetNextLength()];
 
    Array.Copy(_items, newArray, _items.Length);
 
    _items = newArray;
 
 
    _mapping = new int[_items.Length];
 
    for (int i = 0; i < _lowestUntouchedIndex; ++i)
    {
        int mappedIndex = GetMappingIndex(_items[i].Value);
        _items[i].Next = _mapping[mappedIndex];
        _mapping[mappedIndex] = i + 1;
    }
}

Only one detail left before we’re done here.
In the code above, we’re calling GetHashCode again for items we’ve already processed, whenever the size changes. For complex objects this might be a non-trivial calculation and waste time.
Instead, items will store not only a value, but their hash as well, allowing us to simply reuse the stored hash, instead of regenerating it.
Since we already have the hash, we can also improve equality checks with it. Comparing two integers is an easy, quick operation. Not all comparisons are. If the hash of two objects is different, we don’t need to compare them to know they’re not equal.

public class HashSet<T>
{
    private struct Item
    {
        internal T Value;
        internal int HashCode;
        internal int Next;
    }
 
    private Item[] _items;
 
    private int[] _mapping;
 
    private int _freeHead;
    private int _lowestUntouchedIndex;
    private int _count;
 
    public int Count => _count;
 
    public HashSet()
    {
        _items = new Item[3];
        _mapping = new int[_items.Length];
 
        _freeHead = 0;
        _lowestUntouchedIndex = 0;
        _count = 0;
    }
 
    public bool Add(T value)
    {
        if (Contains(value))
            return false;
 
        int added;
        if (_freeHead > 0)
        {
            added = _freeHead;
            _freeHead = _items[_freeHead - 1].Next;
        }
        else
        {
            if (_lowestUntouchedIndex >= _items.Length)
                Grow();
 
            added = ++_lowestUntouchedIndex;
        }
 
        (int index, int hashCode) = GetMappingIndex(value);
 
        _items[added - 1].Value = value;
        _items[added - 1].HashCode = hashCode;
        _items[added - 1].Next = _mapping[index];
        _mapping[index] = added;
 
        ++_count;
        return true;
    }
 
    public bool Contains(T value)
    {
        (int index, int hashCode) = GetMappingIndex(value);
        for (int current = _mapping[index]; current > 0; current = _items[current - 1].Next)
            if (_items[current - 1].HashCode == hashCode && _items[current - 1].Value.Equals(value))
                return true;
 
        return false;
    }
 
    public bool Remove(T value)
    {
        (int index, int hashCode) = GetMappingIndex(value);
        int prev = 0;
        for (int current = _mapping[index]; current > 0; prev = currentcurrent = _items[current - 1].Next)
        {
            if (_items[current - 1].HashCode != hashCode || !_items[current - 1].Value.Equals(value))
                continue;
 
            if (prev < 1)
                _mapping[index] = _items[current - 1].Next;
            else
                _items[prev - 1].Next = _items[current - 1].Next;
 
            _items[current - 1].Next = _freeHead;
            _freeHead = current;
 
            --_count;
            return true;
        }
 
        return false;
    }
 
    private (int Indexint HashCodeGetMappingIndex(T value)
    {
        int hashCode = value?.GetHashCode() ?? 0;
        hashCode &= 0x7FFFFFFF;
        int index = hashCode % _mapping.Length;
 
        return (index, hashCode);
    }
 
    private void Grow()
    {
        Item[] newArray = new Item[GetNextLength()];
 
        Array.Copy(_items, newArray, _items.Length);
 
        _items = newArray;
 
 
        _mapping = new int[_items.Length];
 
        for (int i = 0; i < _lowestUntouchedIndex; ++i)
        {
            int mappedIndex = _items[i].Next % _mapping.Length;
            _items[i].Next = _mapping[mappedIndex];
            _mapping[mappedIndex] = i + 1;
        }
    }
 
    private int GetNextLength()
    {
        int c = _items.Length * 2 + 1;
        for (; Enumerable.Range(2, (int)Math.Sqrt(c)).Any(d => c % d == 0); ++c) { }
        return c;
    }
}

And that’s it!
This is pretty much how HashSet works.
Well this and a lot of different methods to interact with the set, like intersections. But apart from some some fancy helper classes to handle bitmasks, i don’t think there is anything interesting for me to show you.
Most of the time it boils down to enumerating a bunch of items and performing one of the three basic operations with them.

My personal highlight is the linked list in an array.
Very confusing the first time i saw it.
But the idea has actually found a use in one of my projects recently, making it a nice companion to the “wrap object in struct” performance boost.